Start with the Right Prep Work
You want that polished, pro grade finish? Then don’t skip the prep it’s what separates Pinterest goals from garage sale leftovers.
First things first: degreasing. Kitchen cabinets live through years of fingerprints, cooking oil, and airborne grime. Wiping them down isn’t enough. Use a degreaser (TSP or a solid alternative) before you even think about lifting a brush. Paint doesn’t stick to grease, no matter how expensive your primer is.
Next, labeling. Remove all the cabinet doors and hardware, then hit everything with some painter’s tape and a Sharpie. Number the doors, note where each hinge and screw goes. It takes 10 minutes now and saves hours of head scratching later. Nothing kills momentum like matching hinges to the wrong door in the wrong spot.
Finally: sanding. You don’t always have to strip your cabinets down to bare wood. If the factory finish is still intact and smooth, a light scuff with 120 150 grit sandpaper is often enough to help paint stick. But if old paint is peeling or glossy laminate is in play, invest time here or deal with peeling paint later. Sand smart, not hard.
Paint: The Game Changer
Not all paints are built the same especially when you’re tackling kitchen cabinets, which take more daily abuse than most surfaces. For long term durability and a smooth finish, skip the bargain bin. Look for enamel based cabinet paints or urethane modified acrylic latex. Both give you a hard, scrubbable finish that survives greasy fingers, steam, and the occasional pan bump.
Pro tip: always prime. No shortcuts here. Even if your paint says it’s paint and primer in one, a separate bonding primer will hold stronger to slick cabinet surfaces, especially if they were previously stained or laminated.
When it comes to application, it’s not just what you use it’s how. A quality angled brush cuts clean edges along grooves and corners, but don’t push it for flat surfaces unless you’re chasing brush strokes. For those, a smooth mini foam roller lays down a more even coat. Want that glassy finish? Use a paint sprayer. It’s more setup, more cleanup but worth it if you want a factory like look.
Now, onto colors. Earth tones and desaturated hues are trending, but the real win is timelessness. Soft olives, warm taupes, muted navy. They feel modern but have staying power. For a pop, think contrast: deep lower cabinets, lighter uppers. Nothing too loud you want bold without shouting.
Swapping Hardware = Instant Impact
Upgrading cabinet hardware is one of the easiest and most affordable ways to give your kitchen an instant facelift. The right knobs and pulls can shift your kitchen’s entire tone modern, farmhouse, vintage, or minimalist with just a few turns of a screwdriver.
Knobs vs. Pulls: What to Choose
Choosing between knobs and pulls comes down to function and style:
Knobs are great for cabinet doors and can add detail without overpowering the design. They’re easier to install and usually cost a bit less.
Pulls (or handles) work especially well for drawers but can also bring a sleek, elongated look to cabinet doors.
Mixing them adds character try knobs on upper cabinets and pulls on lower cabinets or drawers for balance and ease.
Finishes That Feel Luxe (Without the Price Tag)
You don’t need boutique prices to achieve a high end look. Affordable finishes are widely available and can still offer a premium vibe.
Popular and budget friendly finishes include:
Brushed brass for warmth and subtle shine
Matte black for a bold, modern contrast
Satin nickel for a versatile, classic tone
Antique bronze to lean more traditional or rustic
Choose a finish that coordinates with your existing fixtures or use this as a jumping off point to refresh your faucet or lighting, too.
Get the Placement Right: Measuring Tips
To make your new hardware look seamless and intentional, measuring and alignment are key:
Mark before you drill: Use painter’s tape to test positions before committing.
Use a hardware template: Available at most home improvement stores, these simple guides ensure consistent placement across every door and drawer.
Double check symmetry: Especially on double cabinet doors mismatched heights or spacing can make even expensive hardware look off.
Your attention to detail in this step ensures the result feels polished and professional without paying for custom work.
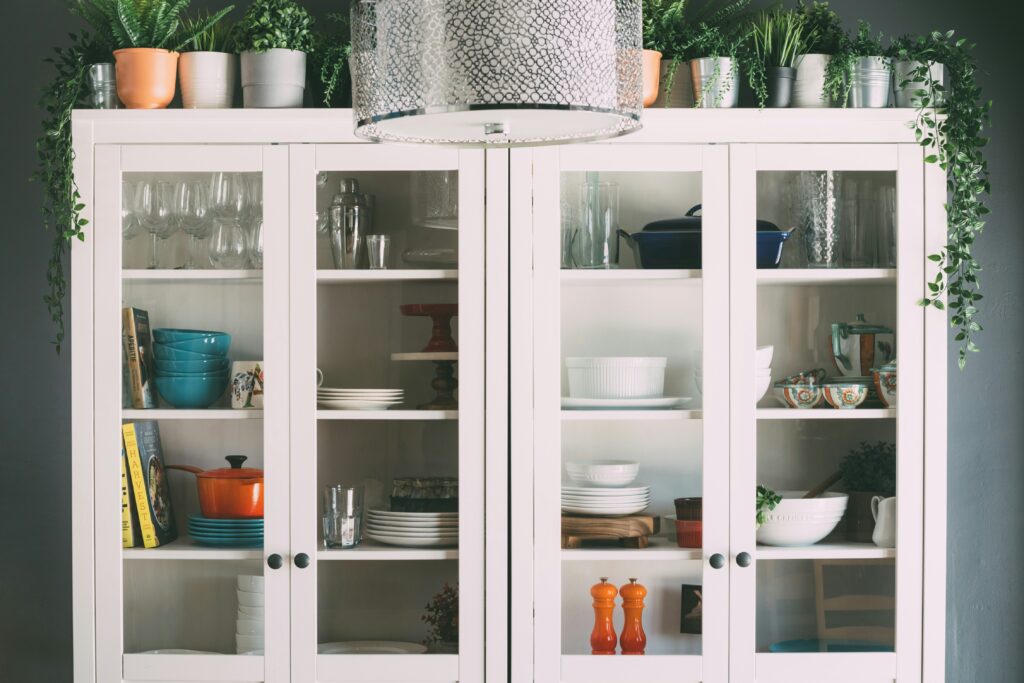
Open Shelving & Door Removal

Ditching cabinet doors isn’t about trends it’s about breathing room. If your kitchen feels cramped or shadowed, popping the fronts off upper cabinets can open it up fast. Choose sections you actually want to display think neatly stacked dishes, wood cutting boards, matte ceramics. Skip the Tupperware shelf.
Once the doors are off, paint or line the cabinet interiors in a tone that complements the rest of the room. This isn’t just about showing off it keeps the look polished. Stick with a neutral base and group items by color or material to avoid visual chaos. Baskets can help with smaller bits and keep the styling tight.
Want more impact? Pair open shelving with a shiplap backdrop for dimension. Follow this shiplap install tutorial and you’ll instantly add a custom feel that fits both modern and cozy aesthetics.
Done right, open shelving makes your kitchen feel bigger, brighter, and more personal. Just be ready to wipe those shelves more often it’s the price of looking this put together.
Resurfacing & Trim Add Ons
Flat cabinet doors are a blank canvas and giving them a shaker style upgrade is easier than most think. All it takes is some trim, a saw, and commitment. Measure carefully, cut strips of wood or MDF, glue or tack them on with brad nails, then paint everything one unified color. Suddenly, your plain cabinet doors have dimension and style without replacing a thing.
Want a richer feel? Peel and stick veneers bring the look of natural wood grain without the mess of real carpentry. They’re great for covering cabinet faces or even adding a subtle accent line. Application takes patience (read: don’t rush the corners), but the finished look adds warmth that screams custom.
Then there’s color contrast. Two tone kitchens are still going strong but the trick is balance. Go darker on lowers, lighter on uppers, or anchor a bold island against neutral base cabinets. Keep your palette tight and lean minimalist on hardware. The goal is intentional contrast, not chaos.
Resurfacing might sound ambitious, but these upgrades stay accessible for most DIYers. The end result? A kitchen that fakes a full reno for a fraction of the price.
Small Fixes That Sell the Big Picture
If you don’t have time for a full cabinet overhaul, a few small changes go a surprisingly long way. Start with lighting. Stick on LED puck lights or strip lighting tucked under the top cabinets can change the mood of your whole kitchen. Mount them toward the back edge of the bottom panel to keep the glow soft and hidden. Most versions are battery powered or use easy plug ins no electrician needed.
Next up: hinges. Swapping out your cabinet hardware for soft close hinges is an instant upgrade. No more slamming doors, plus it gives your kitchen that high end feel without a full remodel. The job’s simple remove the old hinge, match drill hole spacing, and screw in the new hardware. You can outfit a whole kitchen in a quiet evening.
And finally, grab a caulk gun and touch up where walls meet cabinets and counters. Worn or cracked caulk lines make a space look grimy, even when it’s clean. Peel off the old stuff, mask clean edges with painter’s tape, run a fresh smooth bead, and pull the tape before it dries. It’s easy to overlook, but it makes everything else feel tighter, neater, newer.
Pulling the Whole Look Together
You’ve painted, swapped hardware, refinished surfaces now it’s time to tie everything together. A cohesive finish is often what makes a DIY cabinet makeover look like it came straight out of a design magazine.
Coordinate Surrounding Elements
Think beyond the cabinets. Surrounding design choices can either elevate or clash with your newly updated focal point. Here’s how to create harmony:
Backsplash: Choose tiles or materials that complement your cabinet color and hardware. Subway tile is timeless, while patterned accents can bring personality.
Flooring: Ensure your flooring balances the cabinet tone. Warm woods pair beautifully with cool cabinet hues, and vice versa.
Wall Accents: Light, neutral tones keep the space bright, but a feature wall can add depth without overwhelming the room.
Add Depth with Texture
If you’re looking for added dimension, consider introducing texture through shiplap or other wall treatments.
A shiplap accent wall behind open shelving or as a backdrop to a breakfast nook can give your space that magazine worthy, custom built vibe.
For a step by step guide, check out this resource: Shiplap Install Tutorial
Final Touch: Make It Intentional
Use textiles, small décor, or even plants to soften the transition between cabinets and surrounding areas.
Match finishes where possible brushed brass fixtures and warm wood barstools, for example, create visual unity.
Finishing strong matters just as much as starting right. Paying attention to these final elements can take your DIY makeover from “nice try” to “nailed it.”
Final Tips for a Pro Level Finish
Here’s the truth most DIY guides don’t emphasize: the difference between a passable cabinet refresh and one that looks truly pro level often comes down to patience. Respect the dry times don’t rush coats of paint or adhesive. Even the best work will bubble, streak, or peel if you get antsy. Let each step cure fully. It’s boring. But it matters.
Now, personality. Too many DIYers stuff their spaces with trendy touches or overcorrect with sterile minimalism. You only need one or two details that reflect you maybe it’s a bold color inside a cabinet, vintage hardware, or a subtle stencil backdrop. Keep it lean, and each choice will land stronger.
Last: no shame in hiring help, but don’t hand off what you’re fully capable of. Pros are great when you hit wiring, plumbing, or custom carpentry. The rest painting, sanding, organizing belongs to you. With the right effort, your kitchen can look gallery worthy, without looking like you hired out the soul of it.
 Ask Stephen Wertzorens how they got into outdoor living solutions and you'll probably get a longer answer than you expected. The short version: Stephen started doing it, got genuinely hooked, and at some point realized they had accumulated enough hard-won knowledge that it would be a waste not to share it. So they started writing.
What makes Stephen worth reading is that they skips the obvious stuff. Nobody needs another surface-level take on Outdoor Living Solutions, Interior Decorating Tips, DIY Home Projects. What readers actually want is the nuance — the part that only becomes clear after you've made a few mistakes and figured out why. That's the territory Stephen operates in. The writing is direct, occasionally blunt, and always built around what's actually true rather than what sounds good in an article. They has little patience for filler, which means they's pieces tend to be denser with real information than the average post on the same subject.
Stephen doesn't write to impress anyone. They writes because they has things to say that they genuinely thinks people should hear. That motivation — basic as it sounds — produces something noticeably different from content written for clicks or word count. Readers pick up on it. The comments on Stephen's work tend to reflect that.
Ask Stephen Wertzorens how they got into outdoor living solutions and you'll probably get a longer answer than you expected. The short version: Stephen started doing it, got genuinely hooked, and at some point realized they had accumulated enough hard-won knowledge that it would be a waste not to share it. So they started writing.
What makes Stephen worth reading is that they skips the obvious stuff. Nobody needs another surface-level take on Outdoor Living Solutions, Interior Decorating Tips, DIY Home Projects. What readers actually want is the nuance — the part that only becomes clear after you've made a few mistakes and figured out why. That's the territory Stephen operates in. The writing is direct, occasionally blunt, and always built around what's actually true rather than what sounds good in an article. They has little patience for filler, which means they's pieces tend to be denser with real information than the average post on the same subject.
Stephen doesn't write to impress anyone. They writes because they has things to say that they genuinely thinks people should hear. That motivation — basic as it sounds — produces something noticeably different from content written for clicks or word count. Readers pick up on it. The comments on Stephen's work tend to reflect that.